Here are a few pictures of Scary Apartment #1 AFTER the gross, not-vacuumed ever carpet was removed and after the exterminator made the first of his three visits.
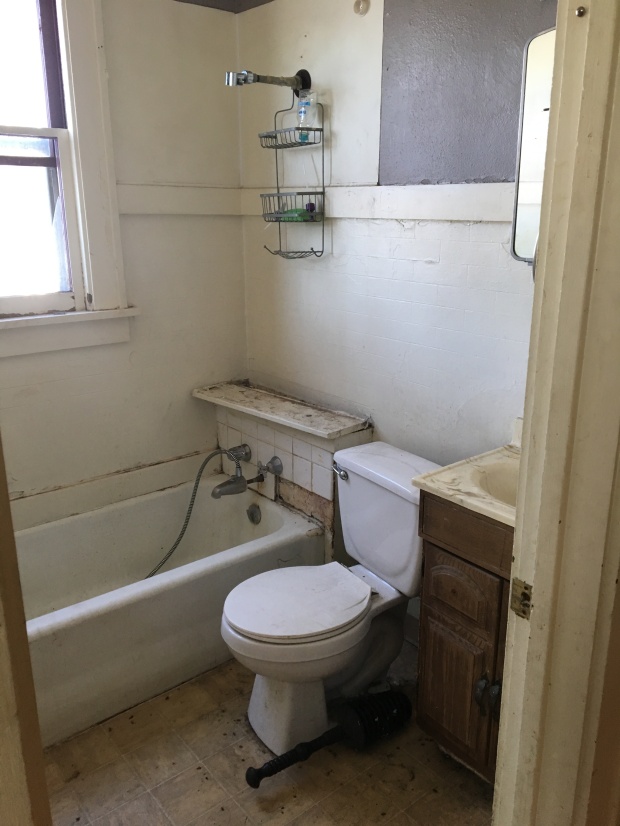
When we first saw the apartment, it was quite overwhelming. It was so dirty and smelled so bad. Every inch was nasty. I wanted to give up.


What we had to deal with :
- severe tobacco residue on all walls and ceilings.
- Multiple broken windows
- Lots of dirt and grime. I don’t think this place was cleaned in the last 3 years that the tenant lived there.
- Gross flooring. The linoleum in the kitchen and bath were disgusting, and the narrow oak flooring (non original) was water damaged, and sanded beyond saving.
- Horrible bathroom conditions- broken tile, chipped tub, lack of a real shower.
What we did:
- Took everything out. The kitchen cupboards we saved. The tub we saved. Everything else went.
- Hired a professional cleaning company. It took them about 16 man hours to get rid of the tobacco residue.
- Painted all walls and ceilings with Kilz. What a pain, but got rid of 100% of the smell and prevented tobacco stain bleed through
- Layed new hickory flooring. We layed the floors, but had them professionally finished.
- Painted all walls Edgecomb Grey by Benjamin Moore. We painted the trim Alabaster by Sherwin Williams.
- In the bath, we used the original tub, but added a real shower head and subway tile surround. The sink is an old one we picked up awhile ago, and the best thing about it is the original custom cabinet that came with it! I this tiny space, storage is key! We also reused the old medicine cabinet. I painted it in kilz and then finished in an enamel paint
- In the kitchen, we bought 20″ appliances. We cleaned the cabinets with TSP, painted with Kilz, and finished with Alabaster semi gloss paint.
- The sink and cabinet! My favorite part. We have had this in our garage for a year. It was really rusty, but we put a steel brush attachment on our grinder and got it down to bare metal! I primed with “stix” primer, and finished with high gloss enamel paint by Sherwin Williams, also in Alabaster. I can’t believe how amazing it looks.
- Also my favorite.. the salvaged French doors! We found them on a swap site and they happened to be the perfect size for the doorway between the small living room and bedroom. The veneer was cracked and peeling. We did a lot of gluing, clamping, and sanding. I primed them with “Stix” primer and painted with semi gloss Alabaster.
And after ALL of that, here are the after pictures!
![FullSizeRender_4[1]](https://myqueenanne.files.wordpress.com/2017/03/fullsizerender_411.jpg?w=620)
![FullSizeRender_3[1]](https://myqueenanne.files.wordpress.com/2017/03/fullsizerender_31.jpg?w=620)
![IMG_6262[1]](https://myqueenanne.files.wordpress.com/2017/03/img_62621.jpg?w=620)
![FullSizeRender[1]](https://myqueenanne.files.wordpress.com/2017/03/fullsizerender1.jpg?w=620)
![FullSizeRender_8[1]](https://myqueenanne.files.wordpress.com/2017/03/fullsizerender_81.jpg?w=620)
![IMG_6258[1]](https://myqueenanne.files.wordpress.com/2017/03/img_62581.jpg?w=620)
![FullSizeRender_12[1]](https://myqueenanne.files.wordpress.com/2017/03/fullsizerender_121.jpg?w=620)
![IMG_6278[1]](https://myqueenanne.files.wordpress.com/2017/03/img_62781.jpg?w=620)
![FullSizeRender_6[1]](https://myqueenanne.files.wordpress.com/2017/03/fullsizerender_61.jpg?w=620)
![FullSizeRender_13[1]](https://myqueenanne.files.wordpress.com/2017/03/fullsizerender_131.jpg?w=620)
I don’t think this space could have been more disgusting when we started. And now it is such a clean, bright and beautiful spot for someone to call home. I’m so glad we didn’t give up on it.


